Isstvan V pt. 2
Battle Missions
The Word Bearers encircle an Iron Hands Dreadnought
The following four mission types represent the bulk of the fighting that occurred on Isstvan V and are intended to be used for most games played in the various phases of the campaign, representing the brutal brother-on-brother fighting of the Dropsite Massacre
Unless specified differently in this section, all the rules and advice given in the Age of Darkness rulebook also apply to fighting Isstvan V battle missions.
In all cases, in addition to the listed victory conditions for any Isstvan V battle mission, completely destroying the enemy force is always a victory.
The Armies
If you have decided to run the Dropsite Massacre campaign as close to its 'historical' basis as possible, your Traitor forces should be drawn from the Sons of Horus, World Eaters, Emperor's Children and Death Guard for the first two phases of the campaign who are then joined by the forces of the Night Lords, Word Bearers, Iron Warriors and Alpha Legion for the final phase. The Imperial Loyalists should be drawn from the Iron Hands, Salamanders and Raven Guard Legions. In addition, Mechanicum, and Solar Auxilia forces the are available to both sides. Imperial Knights and Imperialis Militia would both likely have had forces present. However, Talons of the Emperor, Daemons, Black Shields, and Shattered Legions should not be used in this campaign.
It is recommended that games played use 2,000 - 3,000 points per side. Legendary missions presented in this book will have their own suggested points values and in some cases force compositions which supersede this.
Note: Titans were present on Isstvan V but in 3rd Edition, games using Titans utilize specific missions.
Note: The Dropsite Massacre includes a great deal more forces than the Isstvan III Atrocity. If playing a campaign with friends, feel free to forge a narrative outside of these restrictions. As an example, a Loyalist Force might include a tiny Allied Detachment of embedded Alpha Legion. If a Traitor player fields an Esoterist, there is no reason they should not also be able to “summon” Daemons. On the other hand, an entire army of Daemons would not be appropriate for this campaign.
Khârn the Bloody, Captain of the 8th Assault Company and Equerry to Primarch Angron, World Eaters
Special Characters
The Primarchs Angron, Horus, Fulgrim, Mortarion, Konrad Curze, Alpharius, and Lorgar are available only to players on the Traitor side. The Primarchs Ferrus Manus, Vulkan, and Corvus Corax are available only to players on the Loyalist side. No matter how many players are on a particular side, no more than one of each Primarch may be taken, regardless of the size of battle.
There were many special characters present on Isstvan V. At the moment, I will not provide a list. If they were there, feel free to use them. If you know they weren’t, don’t.
Allied Detachments
You may take Allied Detachments, but they must be from the forces presented.
Fortifications
The use of Fortification detachments may be restricted or increased depending on the Campaign phase being played, otherwise the standard rules for fortification selection and deployment found in the Legacies of the Age of Darkness (PDF) are used.
Suggested Optional Terrain Rules
Mission 1: Brother against Brother
VICTORY CONDITIONS
Primary Mission Objectives
At the end of the game, each side gains 2 Victory Points for each enemy Infantry and/or Command unit they have completely destroyed. For any other unit they have destroyed at the end of the game, they gain 1 Victory Point.
Secondary Mission Objectives
• Slay the Warlord (2)
• Giant Killer (4)
• Last Man Standing (2)
First Turn
The player who deployed first also has the first turn, unless their opponent can Seize the Initiative.
Game Length
This mission lasts for four turns.
MISSION SPECIAL RULES
Reserves, Counter Offensive, and Seize the Initiative.
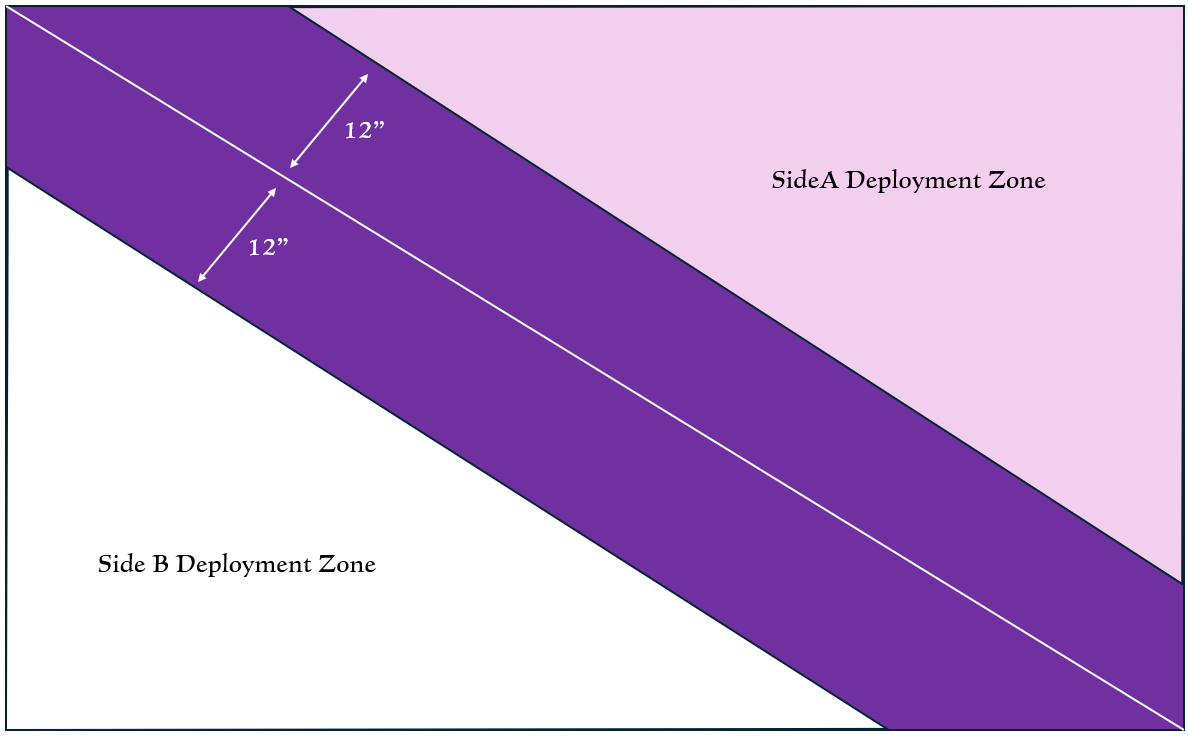
Deployment Map: Brother against Brother
Mission 2: Hammerblow Assault
DEPLOYMENT
This mission uses a specific Attacker and Defender, depending on the Campaign phase of the Dropsite Massacre campaign the players are currently in, which is which, Loyalist or Traitor may also determine who is automatically considered to be Attacker or Defender. If this is not a factor, or those involved are playing this mission outside of a campaign setting, roll off. The winner of this roll may choose whether to be the Attacker or the Defender.
• Once this has been determined, set up any player-owned Fortifications, the Defender first, followed by the Attacker.
• The Defender must deploy first and does so in the Defender's deployment zone. The player's entire force, except for any units held in reserve, is deployed into their deployment zone.
• The Attacker must deploy second and does so in the Attacker deployment zone. The player's entire force, except for any units held in reserve, is deployed into their deployment zone.
VICTORY CONDITIONS
Primary Mission Objectives
Hammerblow Assault's victory conditions are based on the Attacking force trying to smash into their enemy's defences and the Defender trying to stop them.
At the end of the game, the Attacking player gains 2 Victory points for each scoring unit* within the Defender's deployment zone.
At the end of the game, the Defending player gains 1 Victory point for each scoring unit* within their own deployment zone.
* For the purposes of this mission, Infantry and Cavalry units counted as scoring units. Individual Command and Specialist models do not count as scoring units.
Secondary Mission Objectives
• Slay the Warlord (4)
• Giant Killer (3)
• Last Man Standing (2)
First Turn
The Attacker has the first turn, unless their opponent can Seize the Initiative.
Game Length
Variable game length. At the end of the fourth turn, 4+ on a d6 leads to a fifth turn.
MISSION SPECIAL RULES
Reserves, Counter Offensive, and Seize the Initiative.
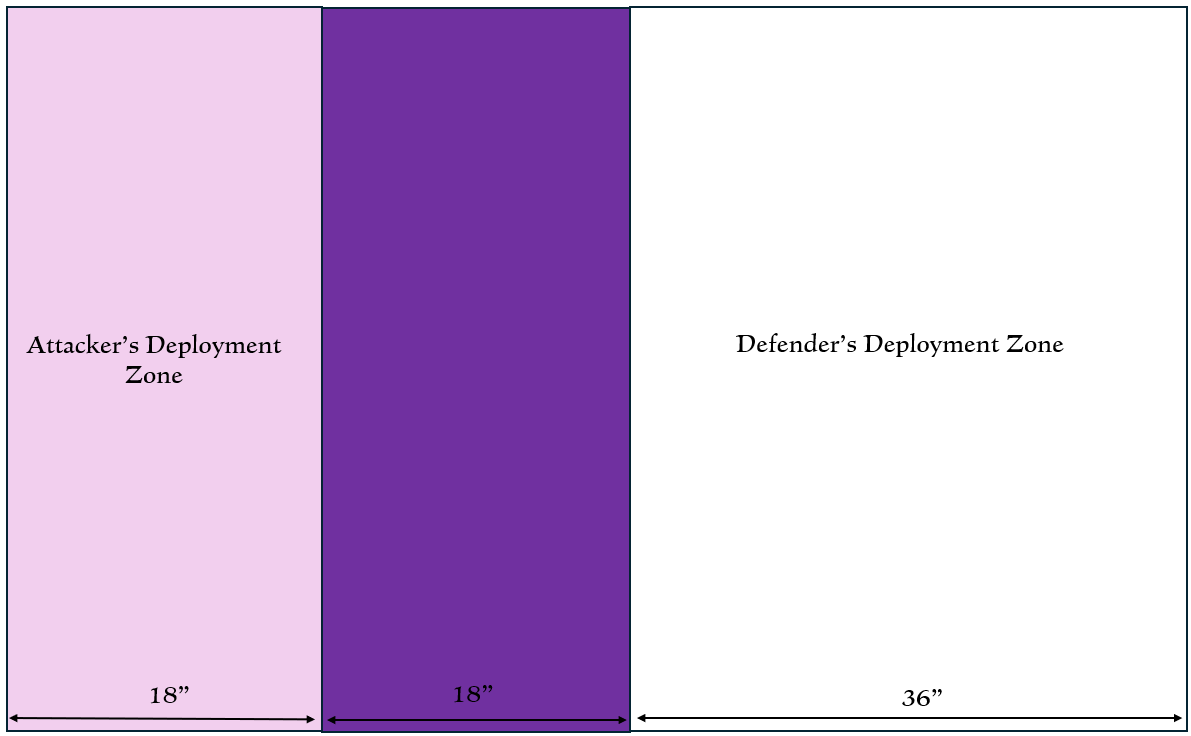
Deployment Map: Hammerblow Assault
Mission 3: Deadly Ground
DEPLOYMENT
In order to deploy the armies and set up for the game, complete the following instructions in the order listed:
• Place a suitable objective terrain piece in the centre of the table. Each side then places a single additional objective terrain piece each 18" away from the centre terrain piece. Then use the Scatter dice and a D6 to move each of the objective terrain pieces (on the roll of a 'hit' they remain stationary).
• Arrange the rest of the terrain for the mission in a mutually agreed fashion (it is possible for terrain to be arranged ahead of time IAW the AoD BRB, however, leave space open for the three objective terrain pieces.
• Roll off to see who deploys first. The winner of the roll may choose whether or not to deploy first or second. The player who deploys first may choose which of the triangular comer deployment zones they take as theirs. Their opponent then takes the opposite deployment zone as theirs.
• The side who deploys first must first deploy any Fortifications it possesses; this must be placed within their deployment zone.
• The side who deploys second must then deploy any Fortification it possesses; this must be placed within their deployment zone.
• The side who deploys first must then place their deployment force in their deployment zone.
• The side who deploys second must then place their deployment force in their deployment zone.
VICTORY CONDITIONS
Primary Mission Objectives
At the start of each player turn, commencing with the second, 4 VP are scored per objective a particular side controls.
Secondary Mission Objectives
• Slay the Warlord (3)
• Giant Killer (2)
• First Strike (3)
• Last Man Standing (2)
First Turn
The player who deployed first also has the first turn, unless their opponent can Seize the Initiative.
Game Length
This mission lasts for four turns.
MISSION SPECIAL RULES
Reserves, and Seize the Initiative.
Compulsory Reserves
Before beginning the game, each side must divide their forces in two as equal as possible halves by their number of units. They must then choose which half to keep in reserve and which to deploy at the start of the game. If the player's forces contain units which must be held in reserve (such as Drop Pods or Flyers), these must be assigned to the Reserves force first before any others.
Objective Terrain
In a mission using this rule, rather than objective markers, individual pieces of terrain are used as objectives. A piece of objective terrain should be distinct and easily identifiable and have a total size of no less than 6" x 12". Additionally, it should be substantial enough to provide cover to infantry models inside it. It is recommended that these pieces be classified as Medium Area Terrain.
In order to claim or deny a piece of objective terrain, a valid unit must have at least one model within 3" of the centre of the objective terrain. A unit may never claim or deny more than a single piece of objective terrain at once.
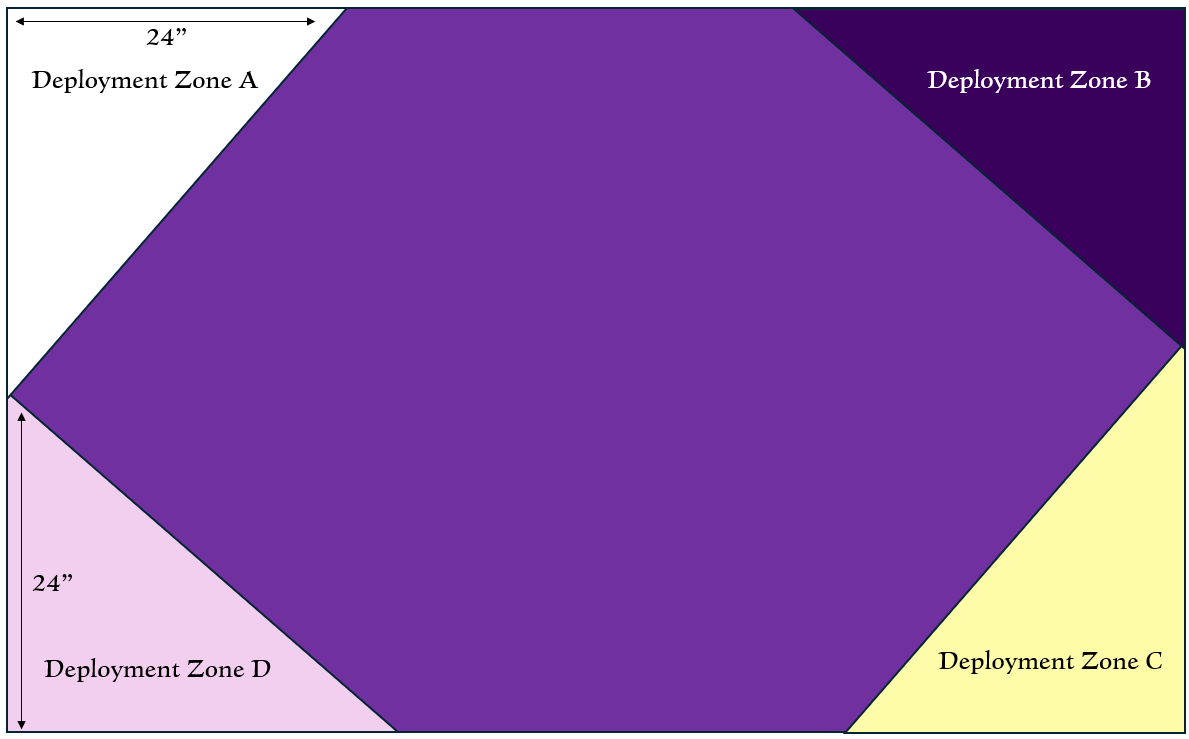
Deployment Map: Deadly Ground
Mission 4: Tide of War
DEPLOYMENT
Use the Dawn of War Deployment Map on p. 305 of the AoD BRB.
Staged Deployment: Roll off to see who deploys first. The winner of the roll may choose whether or not to deploy first or second. The side that deploys first will follow deployment step 1, followed by the side that deploys second. Repeat for step 2.
Staged Deployment Order (Battlefield Role)
1st Fortifications, Lords of War, Armour, and Heavy Support units
2nd All other units
VICTORY CONDITIONS
Primary Mission Objectives
Battlefield Dominion: Each sector of the board is worth an amount of Victory points for the side who controls it. In order to claim a sector, a side must have a superior Tactical Strength in in the sector (see pp. 308-309 of the AoD BRB). For the purposes of this mission, Cavalry models have a Tactical Strength of 2 each.
Note: A 10-man Tactical Squad with Line (2) would have a Tactical Strength of 30.
• Own Deployment Zone: 2 Victory points
• No Man's Land (the area between the two deployment zones): 5 Victory points
• Enemy Deployment Zone: 7 Victory points
• In any sector in which one player has a Tactical Strength of 0, and the other has 1 or greater, the latter player scores an additional VP.
Secondary Mission Objectives
• Slay the Warlord (3)
• Giant Killer (3)
• First Strike (3)
First Turn
The players roll off to determine the first turn, the side who deployed first adds +1 to this roll. The winner of the roll-off may choose whether or not to go first
or second.
Game Length
This mission lasts for four turns.
Conclusion
I hope you enjoyed this post on the missions. I am a little surprised that the previous post on missions is pretty badly performing relative to the other ones. It dropped right around the time that some other people were dropping missions, but the missions from the Black Books are really good! There’s a reason that the 1st edition Heresy community was so strong. I do prefer progressive scoring missions to missions scoring at the end of the game, but these missions I have been going through are so crazily varied and narrative. Anyway, I hope someone gets some use out of them! As always, stay tuned for more Good Times and War Crimes!
In the meantime, you can check me out Instagram or Facebook!